
TL;DR
The Cryo Mix mixing and mastering plugin ships as three pieces that work together: a mixing plugin for your channels, Nova as an intelligent copilot that reads plain language, and a master plugin for the master bus. The mixing plugin holds six module groups (EQ, Dynamics, Pitch, Character, Stereo, and Space) with more than 30 processing stages between them. Everything runs natively on your machine, so there is no bounce, no upload, and no render wait between asking for a change and hearing it. Nova takes plain-language requests across languages, scenes, subcultures, and genres, and builds the chain underneath. We are in beta and improving it daily.
What an all in one mixing and mastering plugin is
An all-in-one mixing and mastering plugin is one plugin that contains everything you need for vocal processing in a single insert. It includes the functionality of the plugins a mix engineer would normally load as separate stages: at minimum EQ, compression, and leveling. More complete stacks add gating, de-essing, saturation, stereo width, and reverb, so one instance can take a raw track from recorded to finished. Cryo Mix goes a step further and includes a pitch correction module inside the same window.
The vocal chain concept grew out of the hardware channel strip: a fixed signal path on a mixing console with preamp, filters, EQ, and dynamics, in that order, on every channel. Software versions like the Waves SSL 4000, UAD Neve 88RS, and Slate Digital VMR emulated the layout and the sound with high accuracy. Most plugins in this category stop at the console feature set. What they leave out is everything that happens after the strip: pitch, modulation, imaging, and space, which live on sends or buses on a mixing desk. That is why a "complete" channel strip still ends up sitting in a chain with four other plugins behind it.
The Cryo Mix mixing and mastering plugin, explained
The Cryo Mix plugin contains every module and mixing tool required for the modern vocal chain, across genres, scenes, and languages. It is the plugin version of the tool we have run in the browser since we launched. On cryo-mix.com you upload stems, the mix and master happen in the cloud, and you download a finished track. That still works. The plugin now allows for maximum workflow integration, especially if you spend your day in a DAW.
The plugin removes the round trip. It runs natively on your machine. You open your DAW, load the plugin, and there is no wait between asking for a change and hearing it. The design goal was not "another channel strip with a nicer skin." It was to cover the whole chain, including the parts channel strips normally skip, and then to make the chain reachable by describing a sound rather than by knowing the name of the tool.
Setting it up in a session: thre plugins, three jobs
Three plugins ship together, and they do different jobs.
The mixing plugin goes on every channel you are working on, not only the ones that need obvious processing. Loading an instance on each channel is what lets the instances communicate with each other and analyze your audio as a whole session rather than as isolated tracks. A single plugin looking at a vocal in isolation can only tell you about that vocal. Instances that can see the rest of the session know what the vocal is competing with.
Nova is your intelligent copilot. It sees every instance of the mixing plugin across your session and translates plain-language requests into concrete parameter changes on the right channels.
The master plugin goes on your master bus and handles the finishing pass. It is a separate plugin because mixing and finishing are different jobs with different tolerances.
That is the whole setup. Load, play, and start describing what you want.
Supported DAWs and formats
The plugin runs as VST3 and AU, on macOS 12 or later and Windows 10 or later. Tested hosts include Logic Pro, Ableton Live 11 and 12, FL Studio 21, Pro Tools 2023.12+, Cubase 12+, Studio One 6+, Reaper 7, Garageband and Bitwig Studio 5. Minimum recommended CPU is Apple Silicon (M1 or newer) or Intel i5 8th gen equivalent with 8 GB RAM. Latency is buffer-size dependent and stays below 5 ms at 128 samples.
Every module inside the mixing plugin
Six groups, each with its own set of stages. Here is the full inventory.
Module group | Stages included |
|---|---|
EQ | Automatic correction curve, aggregate Correction knob, high-pass, low-pass, low/mid/high band control, dedicated Air control, per-stage before/after toggle |
Dynamics | Leveler with response control, two-stage compression (Peak and Level, each with ratio, attack, release), upward compression, thickening, transparent clipper, gate, ducker, de-esser, dynamic resonance suppression |
Pitch | Chromatic or key-locked correction against your own waveform, unison shift, automatic harmony generation |
Character | Four saturation circuits (tube, tape, transformer, console) each with dry/wet blend, destroy stage, bit crusher, exciter, detail lift |
Stereo | Width control, multi-voice chorus (2 to 8 voices, silk or linear motion, independent rate/depth/delay/spread), phaser (4 to 12 stages, sweep rate, depth, center frequency, range, resonance, spread), flanger, tremolo, auto-pan |
Space | Room, hall, plate, and spring algorithms, plus Designer mode: 3D source and mic placement, width/depth/height, wall damping, mic height and axis, tail tone, pre-delay |
EQ: a correction curve without a reference track
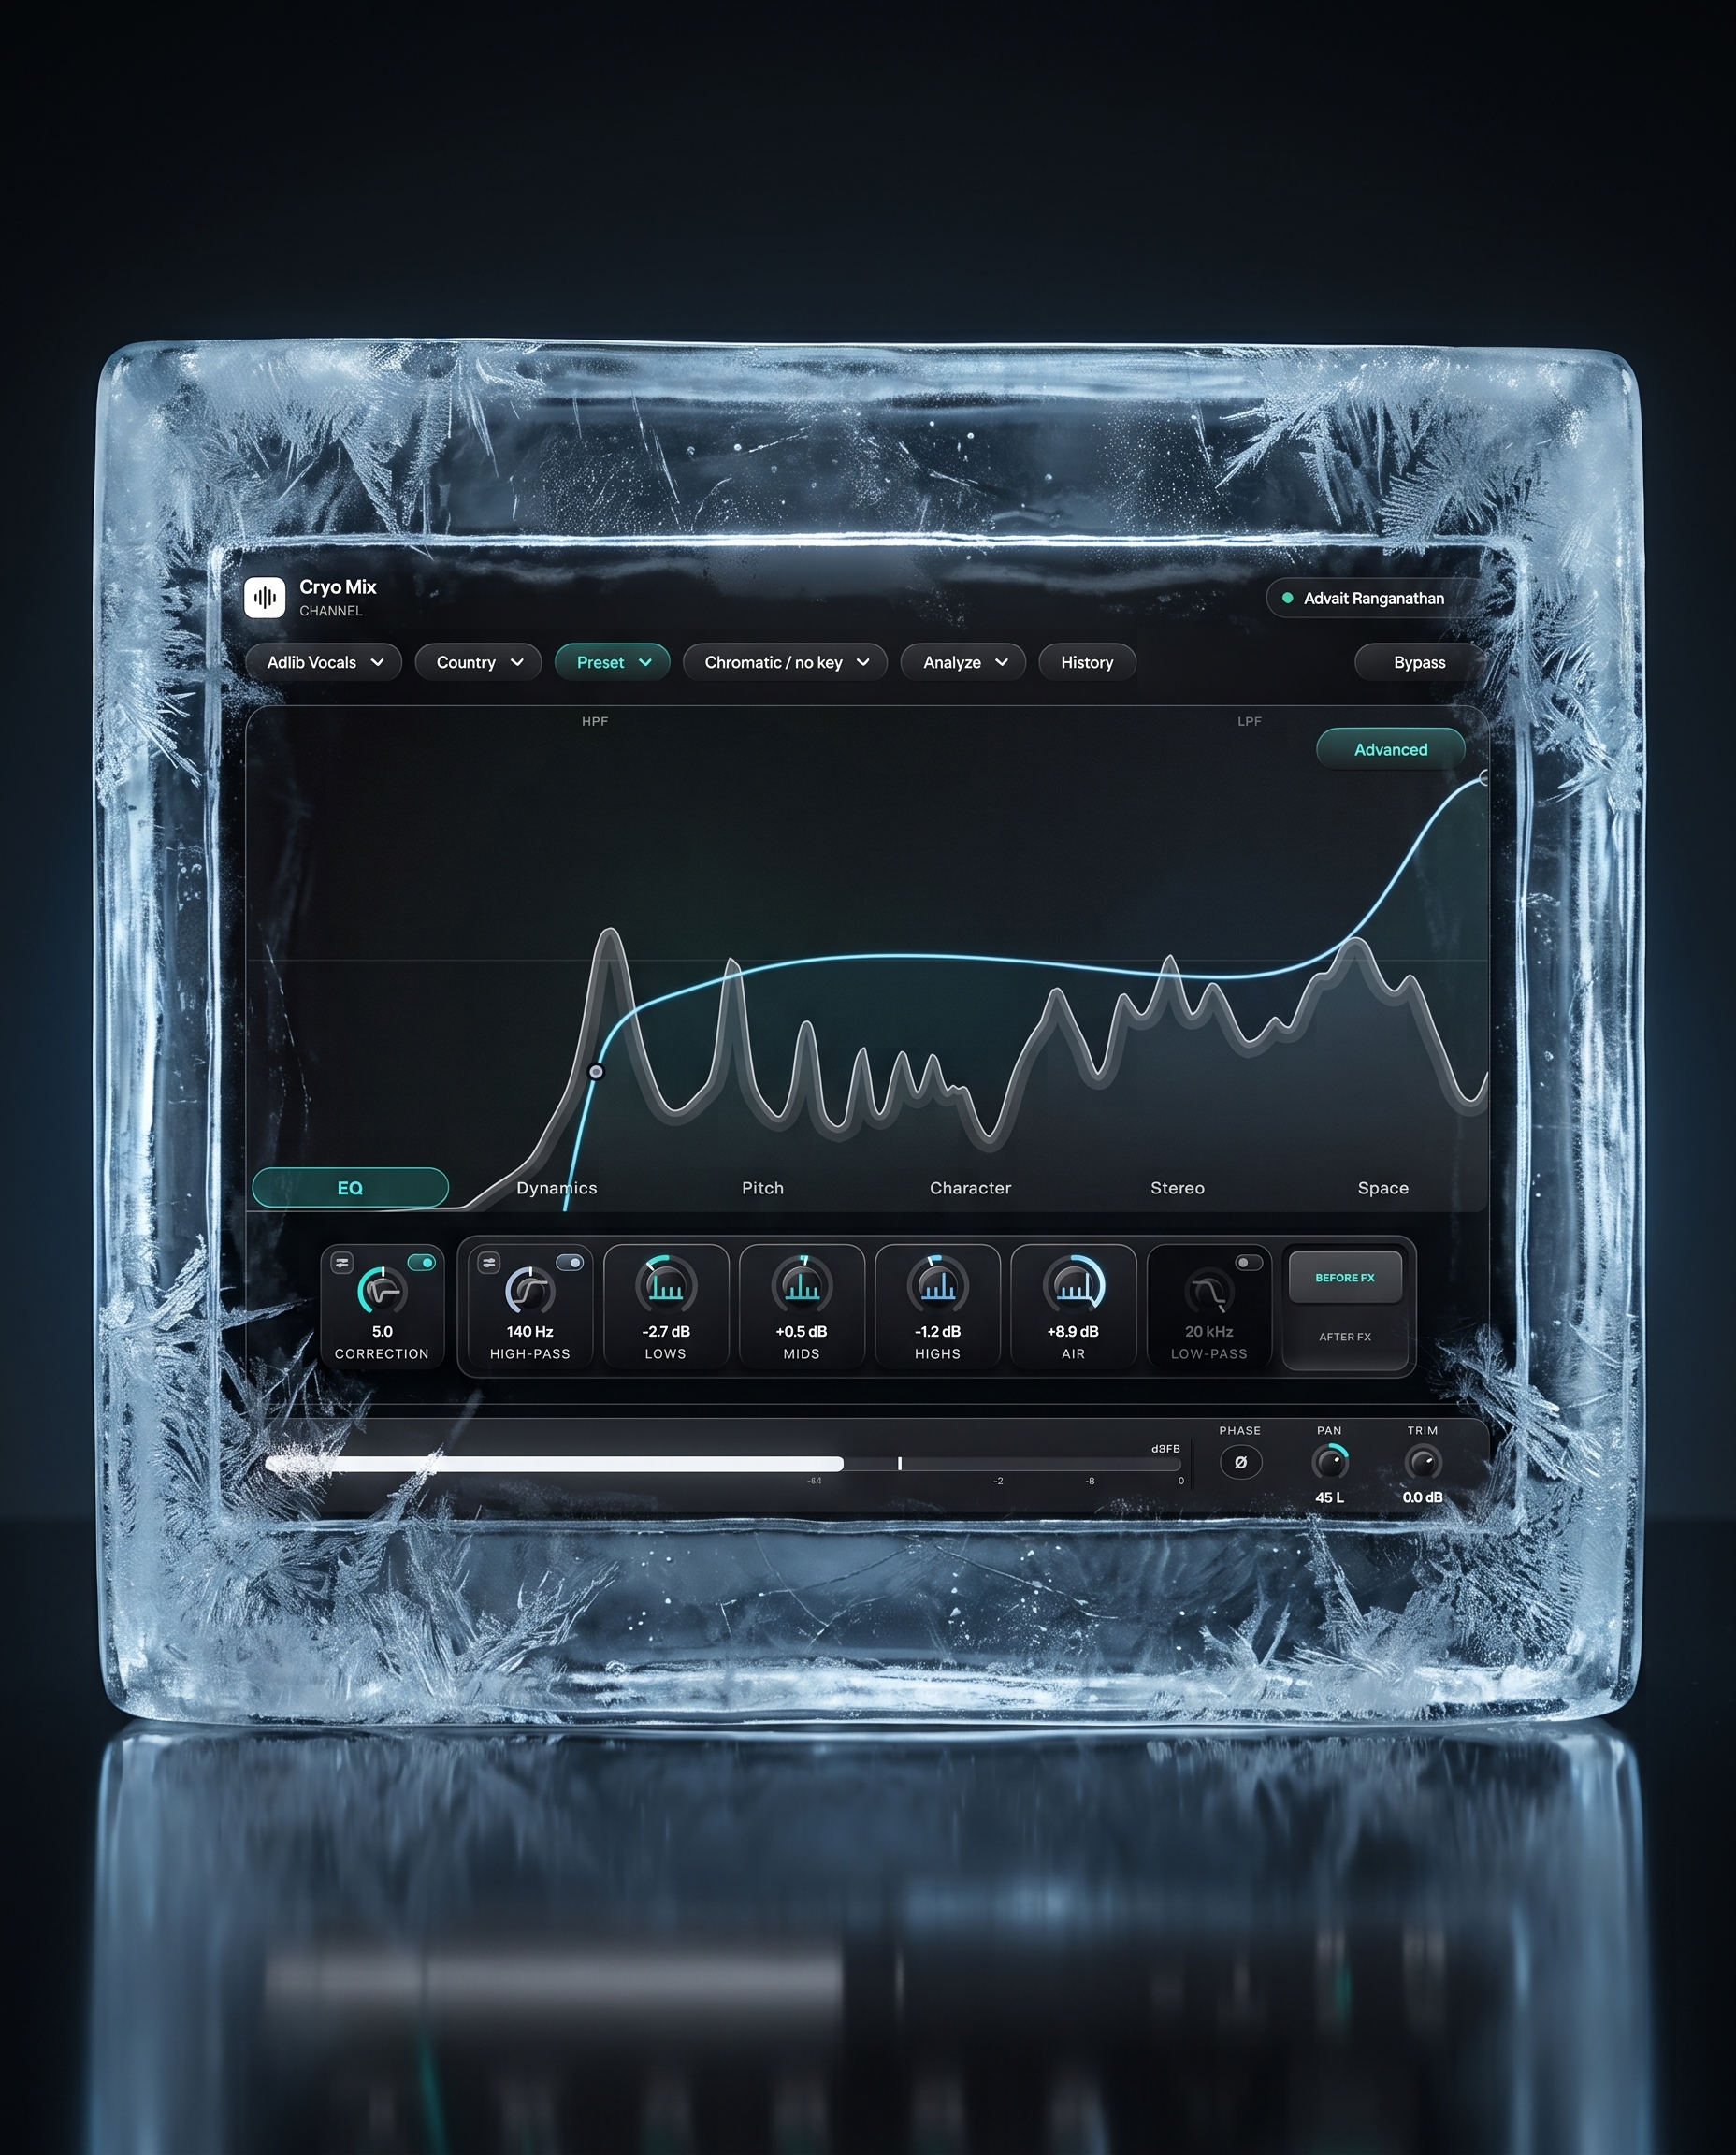
The EQ module builds a correction curve automatically from your take, with no reference track needed. Let the plugin analyze the signal for a moment, and it draws the curve on its own. One aggregate Correction knob dials in how much of that curve applies in a single sweeping move, or you can shape high-pass, low-pass, and the low, mid, and high bands individually. A dedicated Air control adds top-end shimmer on its own dial, the kind of shine that usually means reaching for a separate exciter like Fresh Air or Aural Exciter. Toggle before and after on any stage to hear exactly what changed.
Dynamics: serial compression the way an engineer actually stages it
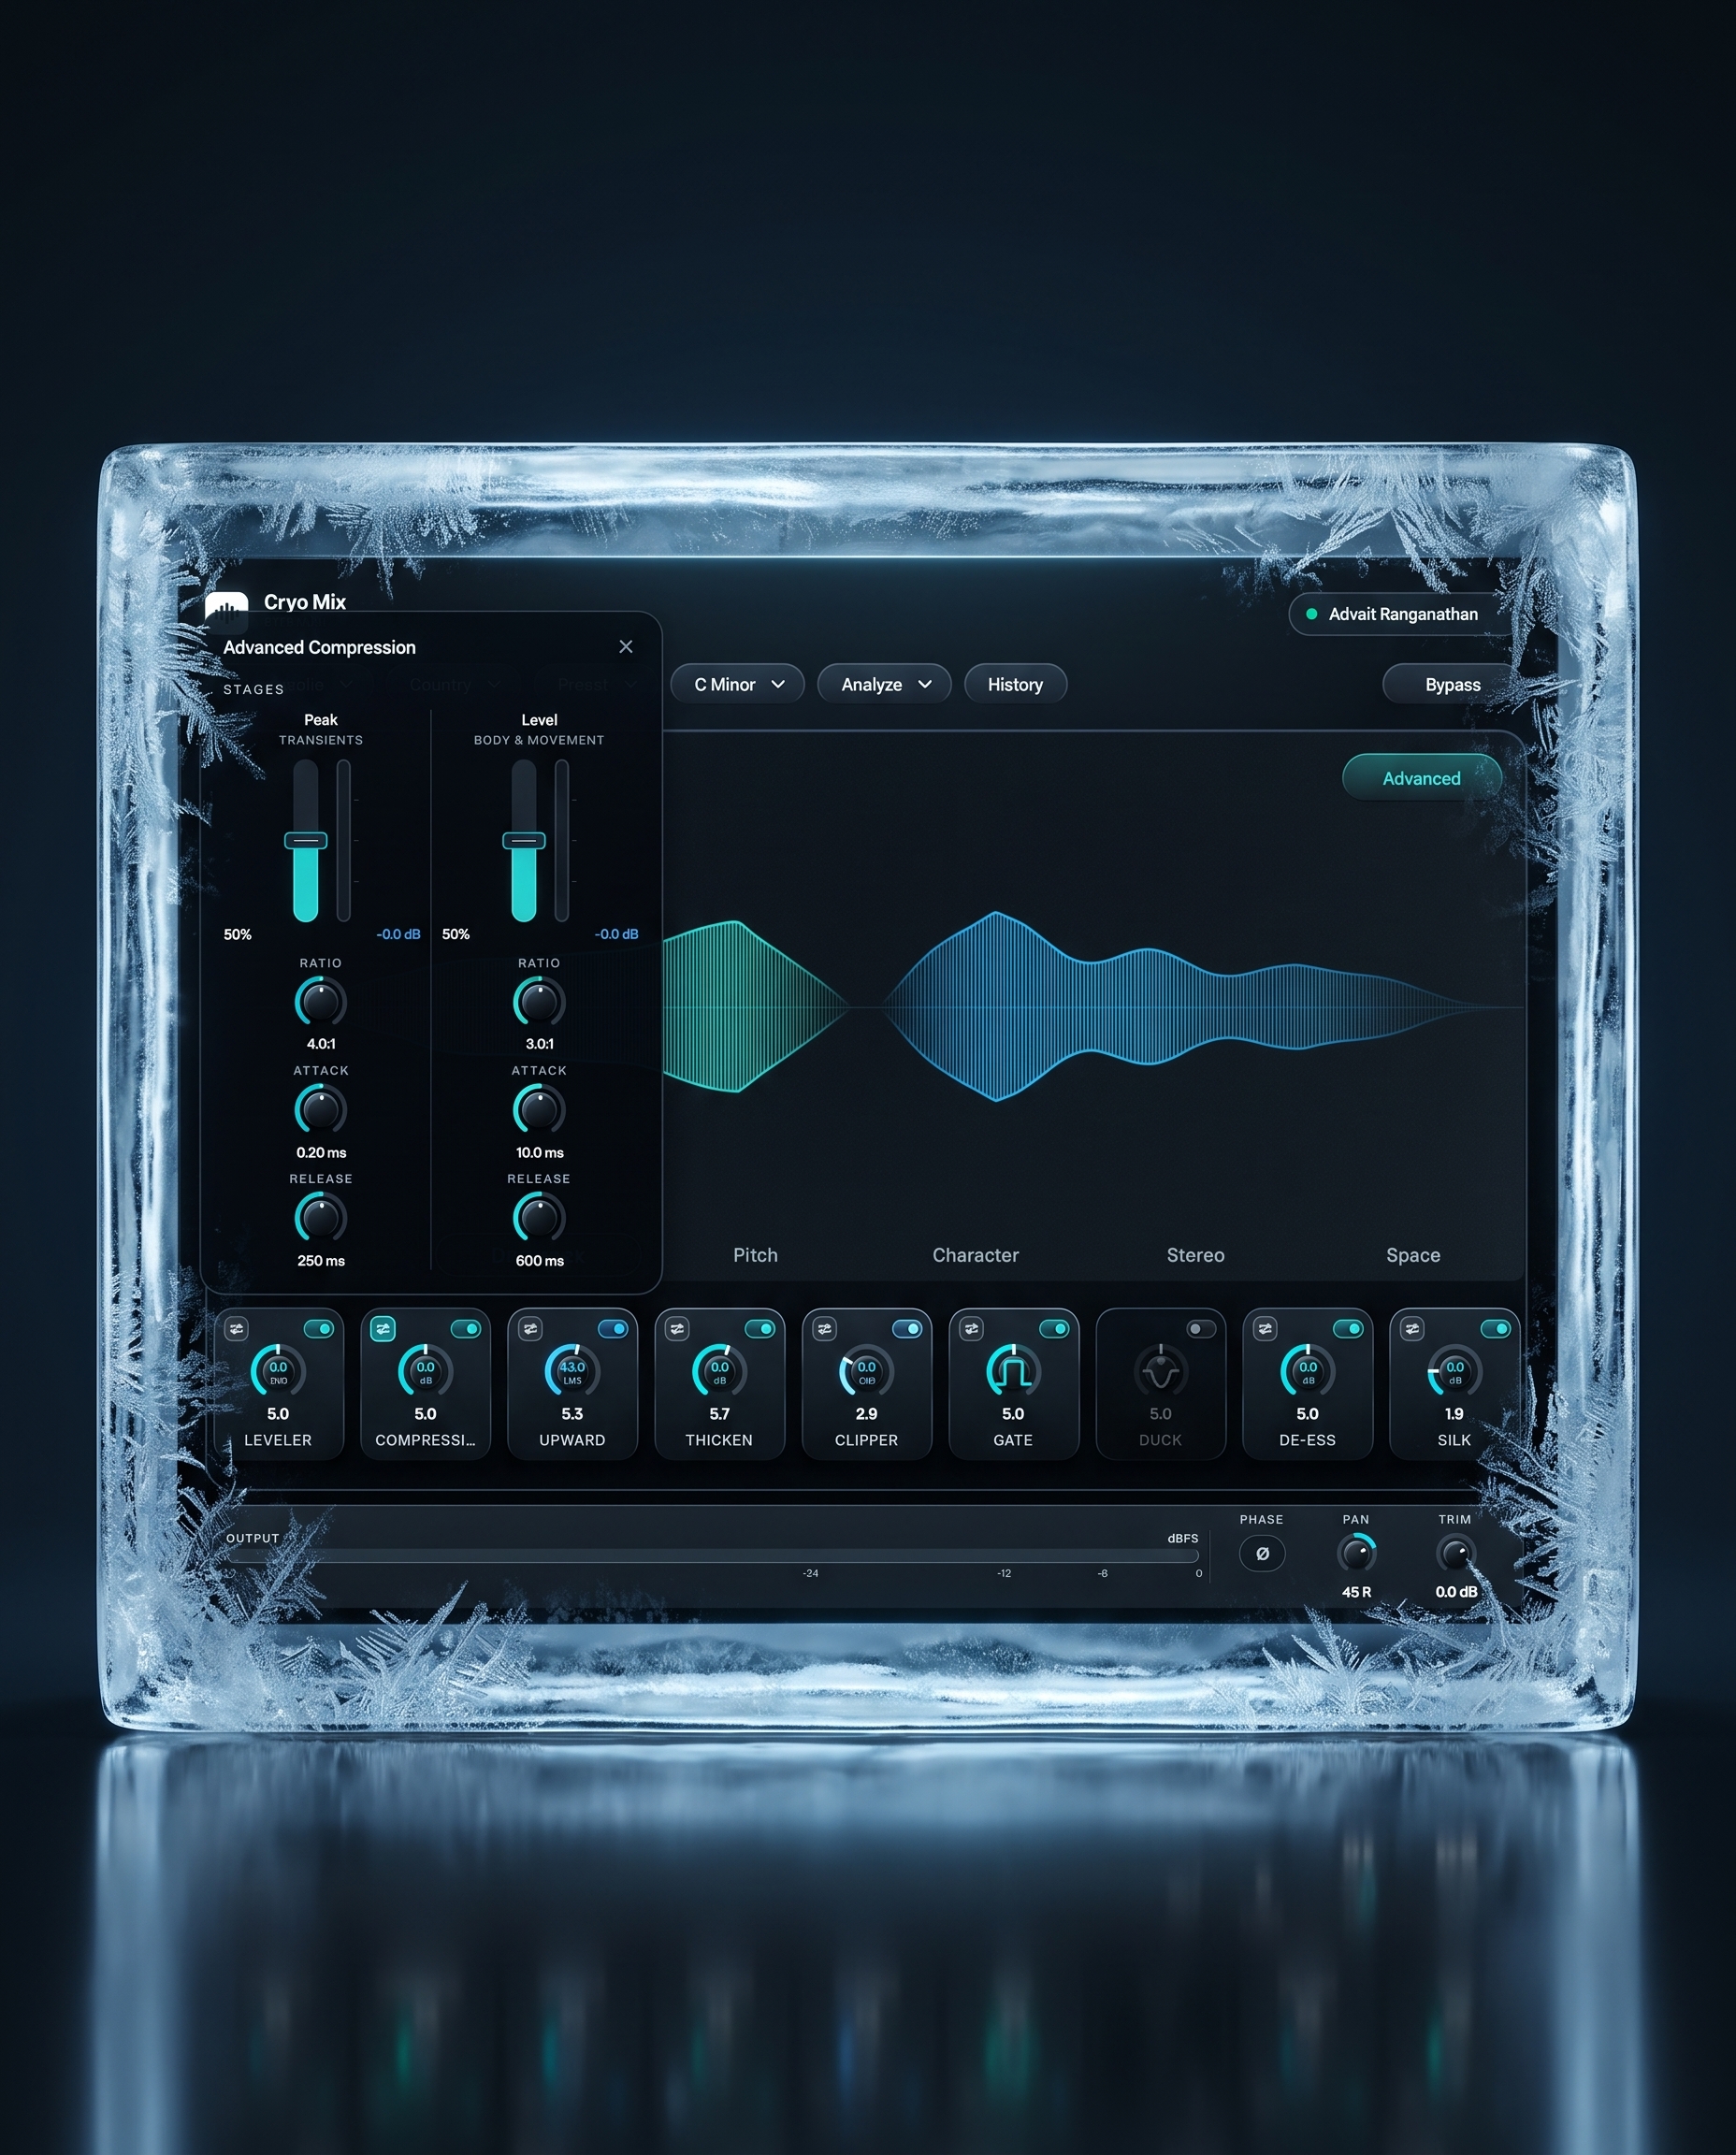
Dynamics in the Cryo Mix plugin runs as a serial chain of nine stages: leveler, two-stage compression (Peak and Level), upward compression, thickening, transparent clipper, gate, ducker, de-esser, and dynamic resonance suppression. Different parts of a signal want different treatment, and the module is built around that idea.
The leveler rides your level automatically in real time, with a response control you can push anywhere from fast to smooth depending on how much movement you want to preserve. Compression itself runs in two full stages: Peak for transients and Level for body and movement. Each stage gets its own ratio, attack, and release, so you can clamp a spike hard and fast while letting the sustained part of the note breathe on a slower curve. Upward compression lifts quiet detail instead of only squashing loud peaks. Thickening adds density. The transparent clipper catches remaining peaks without audible distortion. The gate, ducker, and de-esser handle the standard jobs. Dynamic resonance suppression quiets harshness the moment it appears, without you touching an EQ band by hand, in the same category of tool as Soothe2.
If your source is clipped before it ever reaches the plugin, no dynamics stage will undo that. Our guide on audio clipping covers what to fix at the recording stage instead.
Pitch: correction you watch against your own waveform
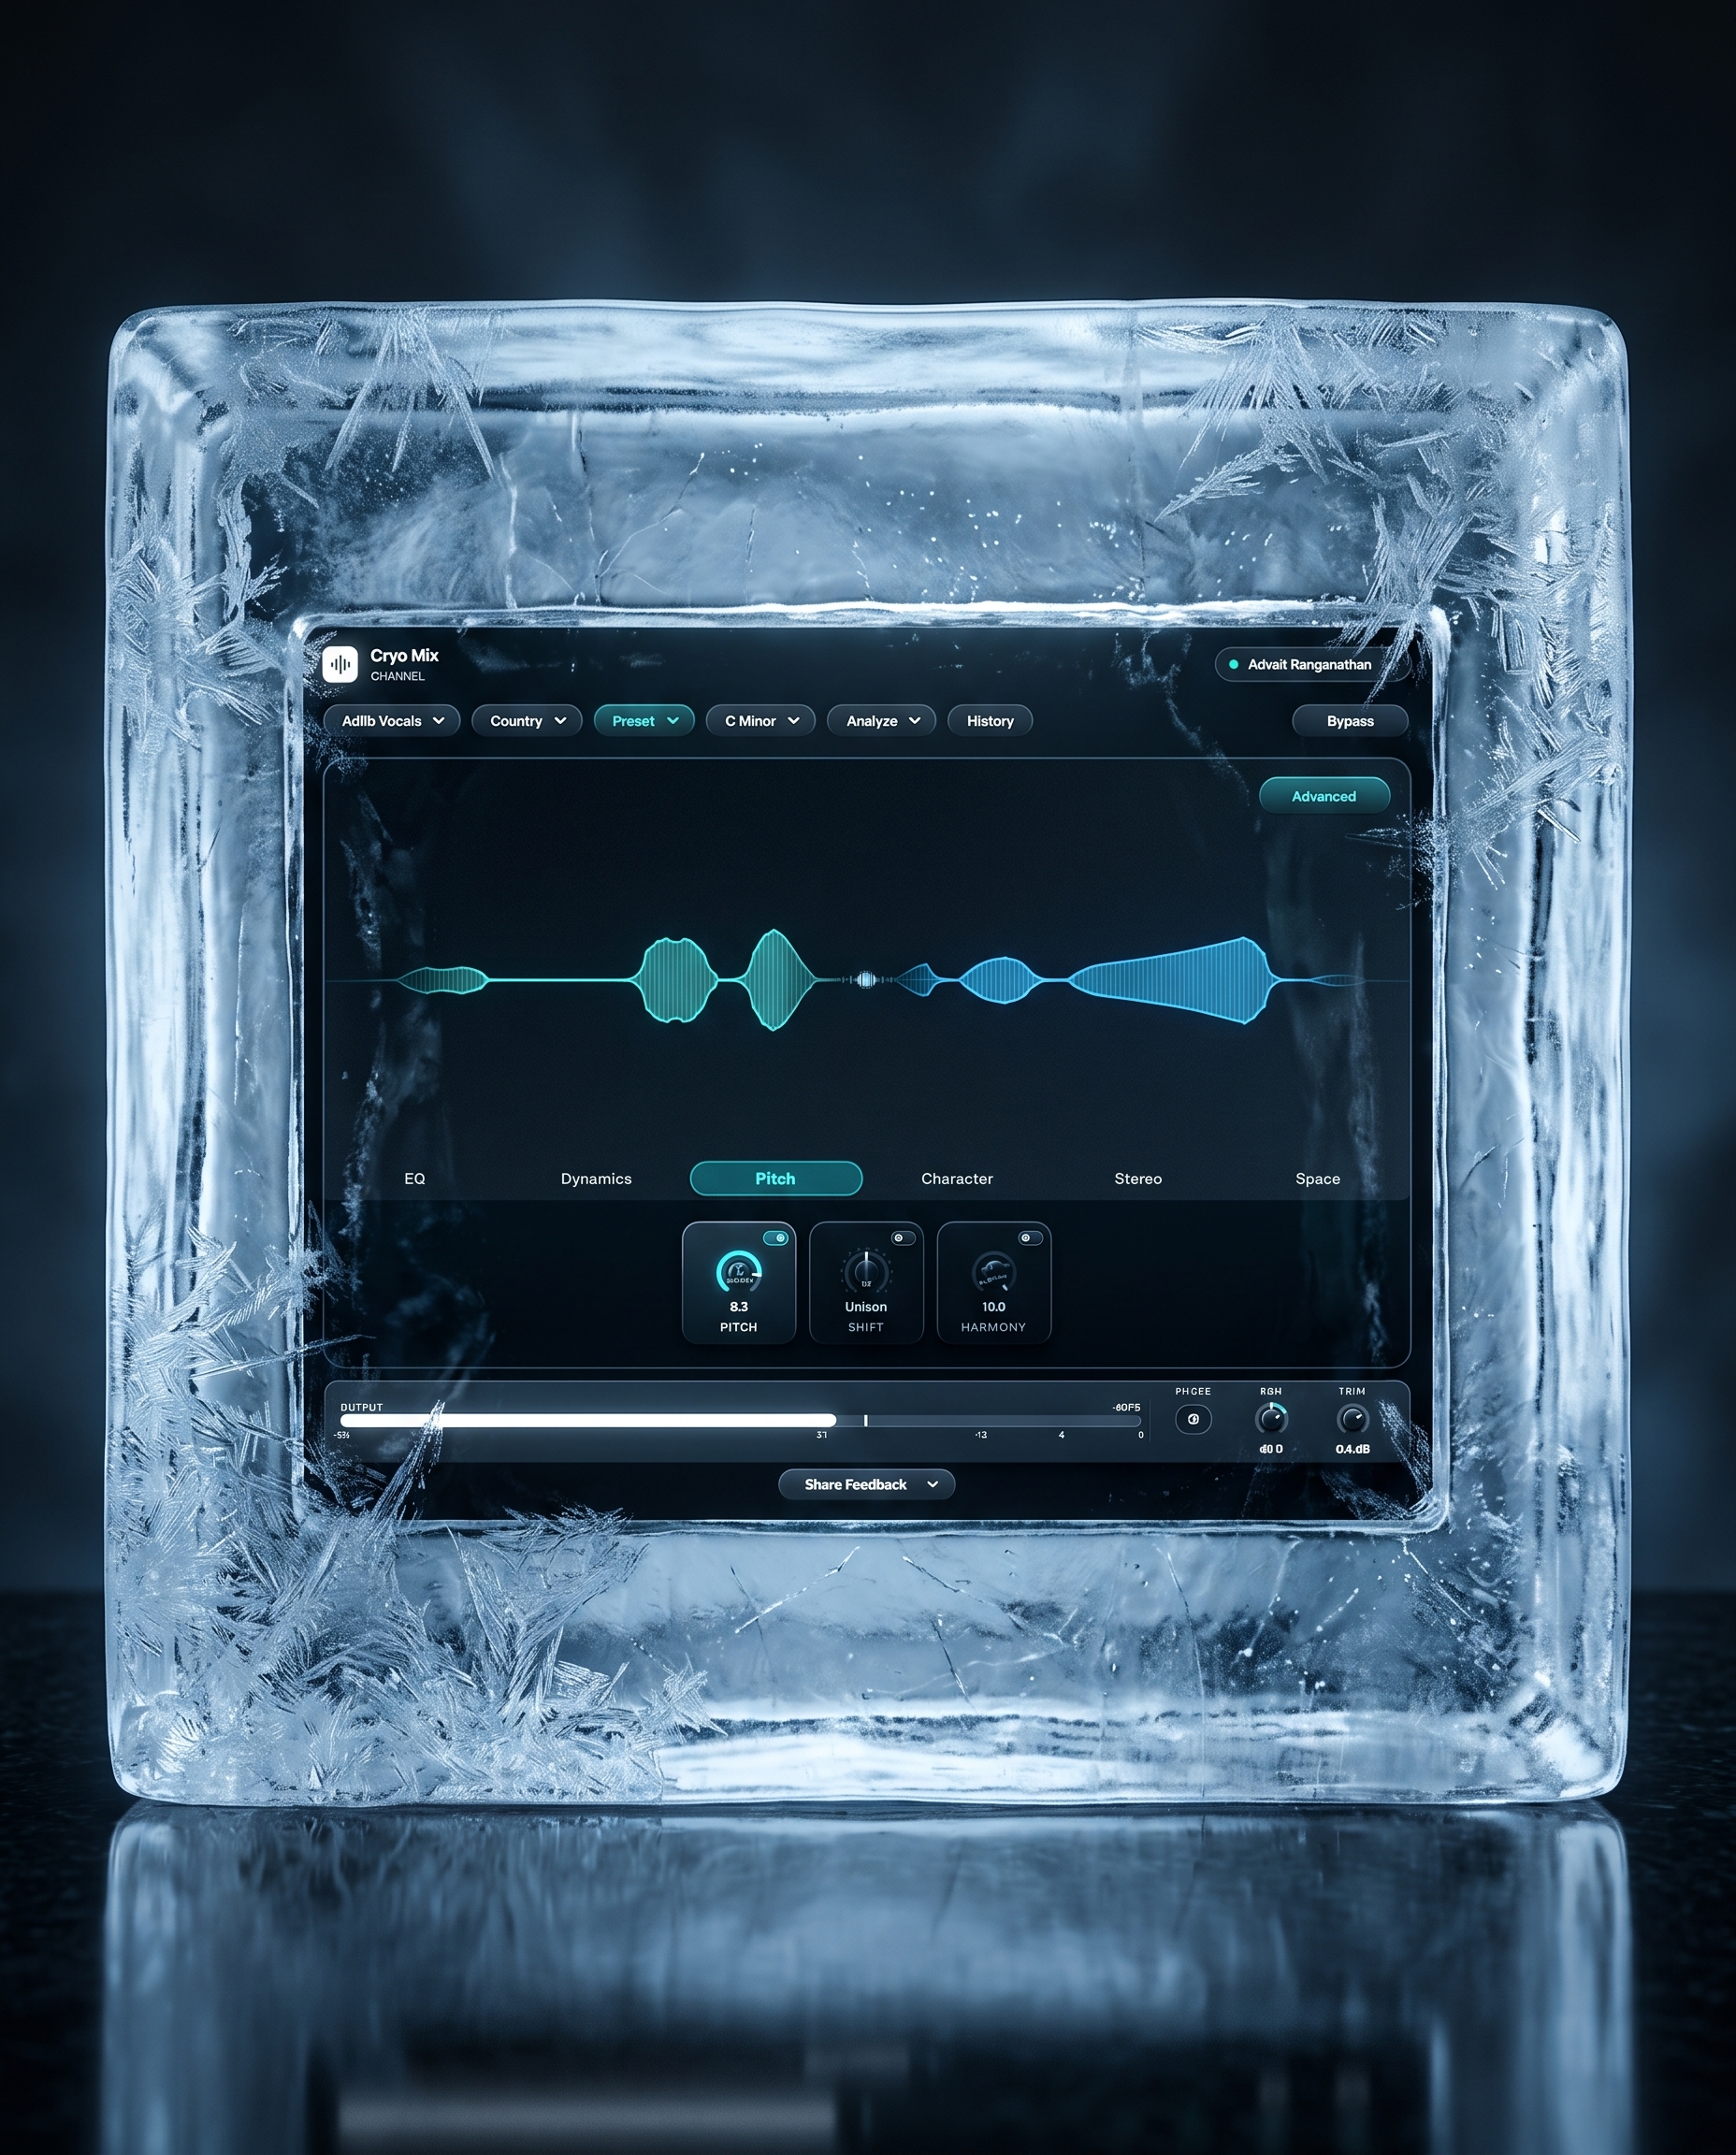
Pitch correction runs chromatic or locked to a key, and you watch it work directly against your waveform instead of reading a number on a meter. Add unison shift for a doubled, widened vocal, or automatic harmony that builds real harmonic layers off your lead take rather than stacking a generic interval on top of it. If you are not sure what key you are in, the free BPM and key detector will tell you before you set the mode. It is the same category of tool as Auto-Tune Pro and Melodyne, tuned to sit inside a single vocal chain.
Character: four saturation circuits, blended
The Character module contains four full saturation circuits (tube, tape, transformer, console), each modeling a different kind of harmonic behavior. Every circuit gets its own dry-to-wet blend, so you can push it as far as you want without losing the original signal underneath. Beyond that: a destroy stage for anyone who wants it broken on purpose, a bit crusher, a second exciter for top-end presence, and a detail lift stage built specifically to bring back the transient clarity that saturation tends to soften.
Stereo: full designers, not one rate knob
Most channel strips treat stereo effects as an afterthought: one knob for rate, one for depth, done. That is fine until you want a specific width or movement and the tool does not have the range to get there, so you reach for a third-party plugin to finish one small idea.
Width control sits at the front. The chorus lets you pick voice count from 2 up to 8, choose between silk or linear motion, and shape rate, depth, delay, and stereo spread independently. The phaser works the same way: choose how many stages the sweep runs through, 4 up to 12, then dial in sweep rate, depth, and center frequency alongside range, resonance, and stereo spread. Flanger, tremolo, and auto-pan round out the rest with the same level of control underneath. Worth remembering that width you add here can partly collapse when a listener hears the track in mono, so check both.
Space: place the source in a room you built
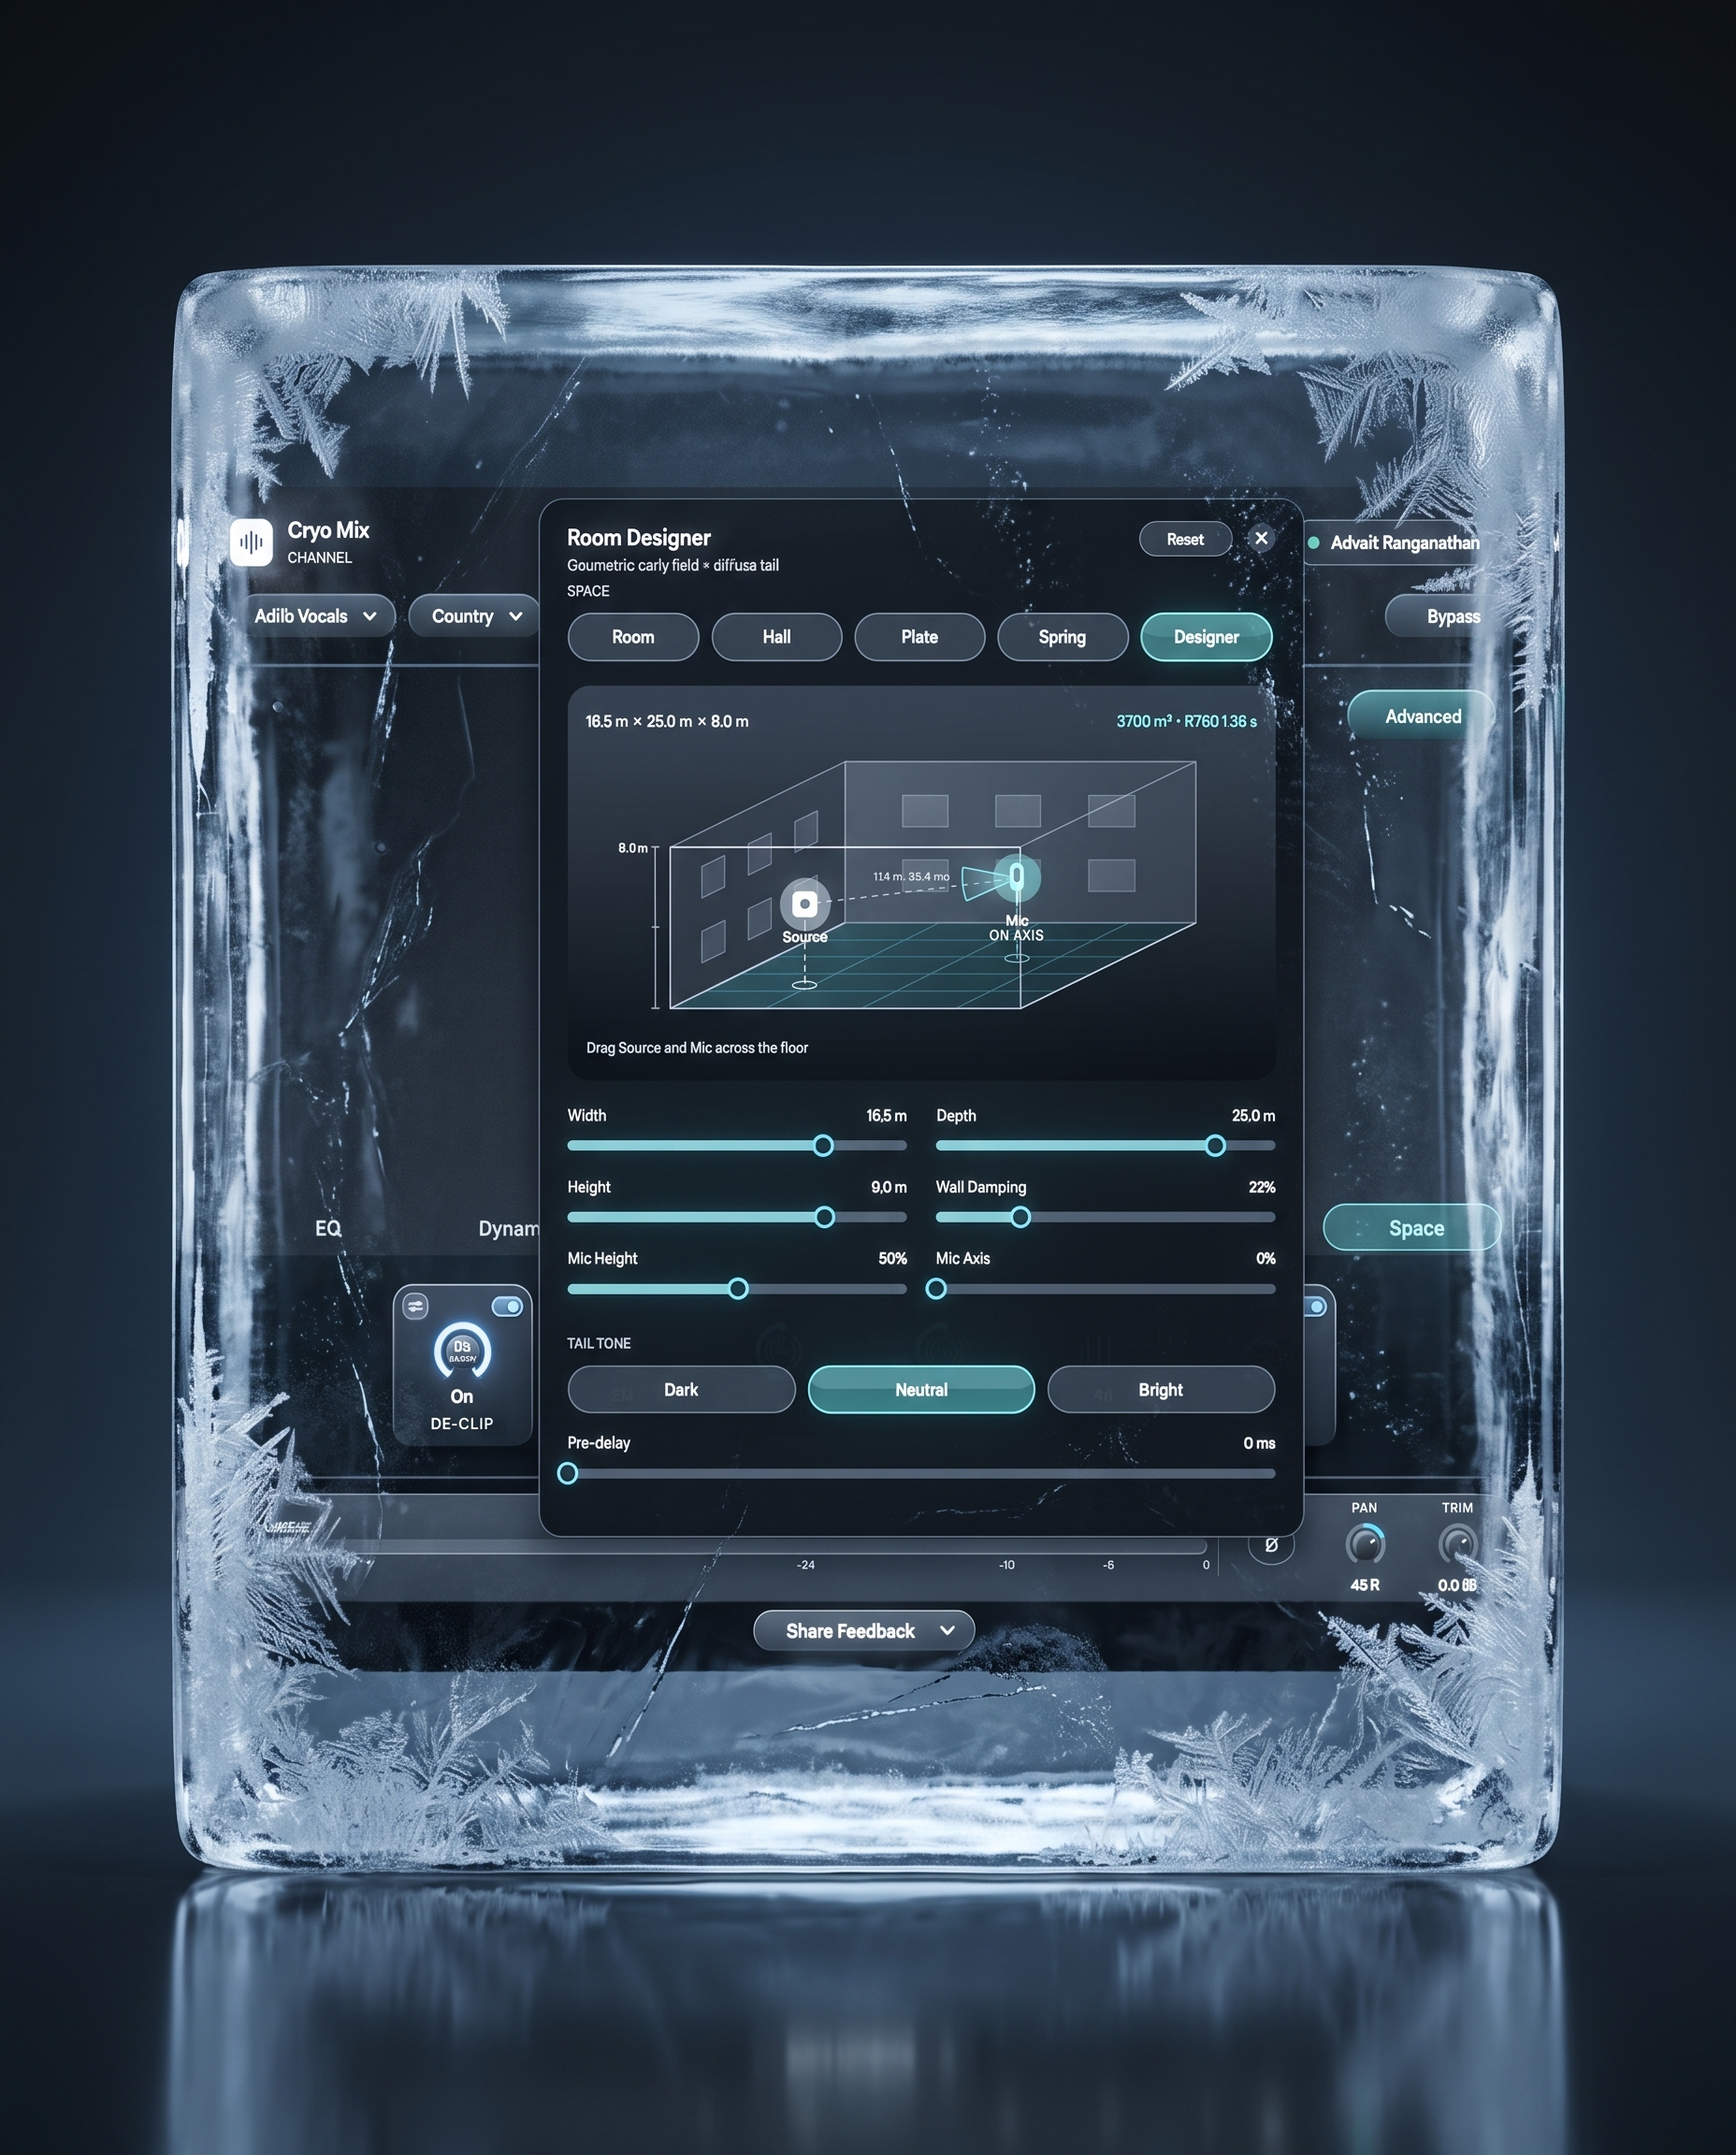
The Space module contains four standard algorithms (room, hall, plate, spring) that cover most of what you reach for day to day. Designer mode goes further. You place the source and the mic on an actual 3D floor, drag them around a real room, and shape width, depth, and height directly, along with wall damping so the room sounds as live or as dead as the take needs. Mic height and axis adjust how that position is heard, tail tone shifts dark to bright, and pre-delay sits right there alongside everything else. No separate plugin, no separate window.
Nova turns a plain-language request into a chain
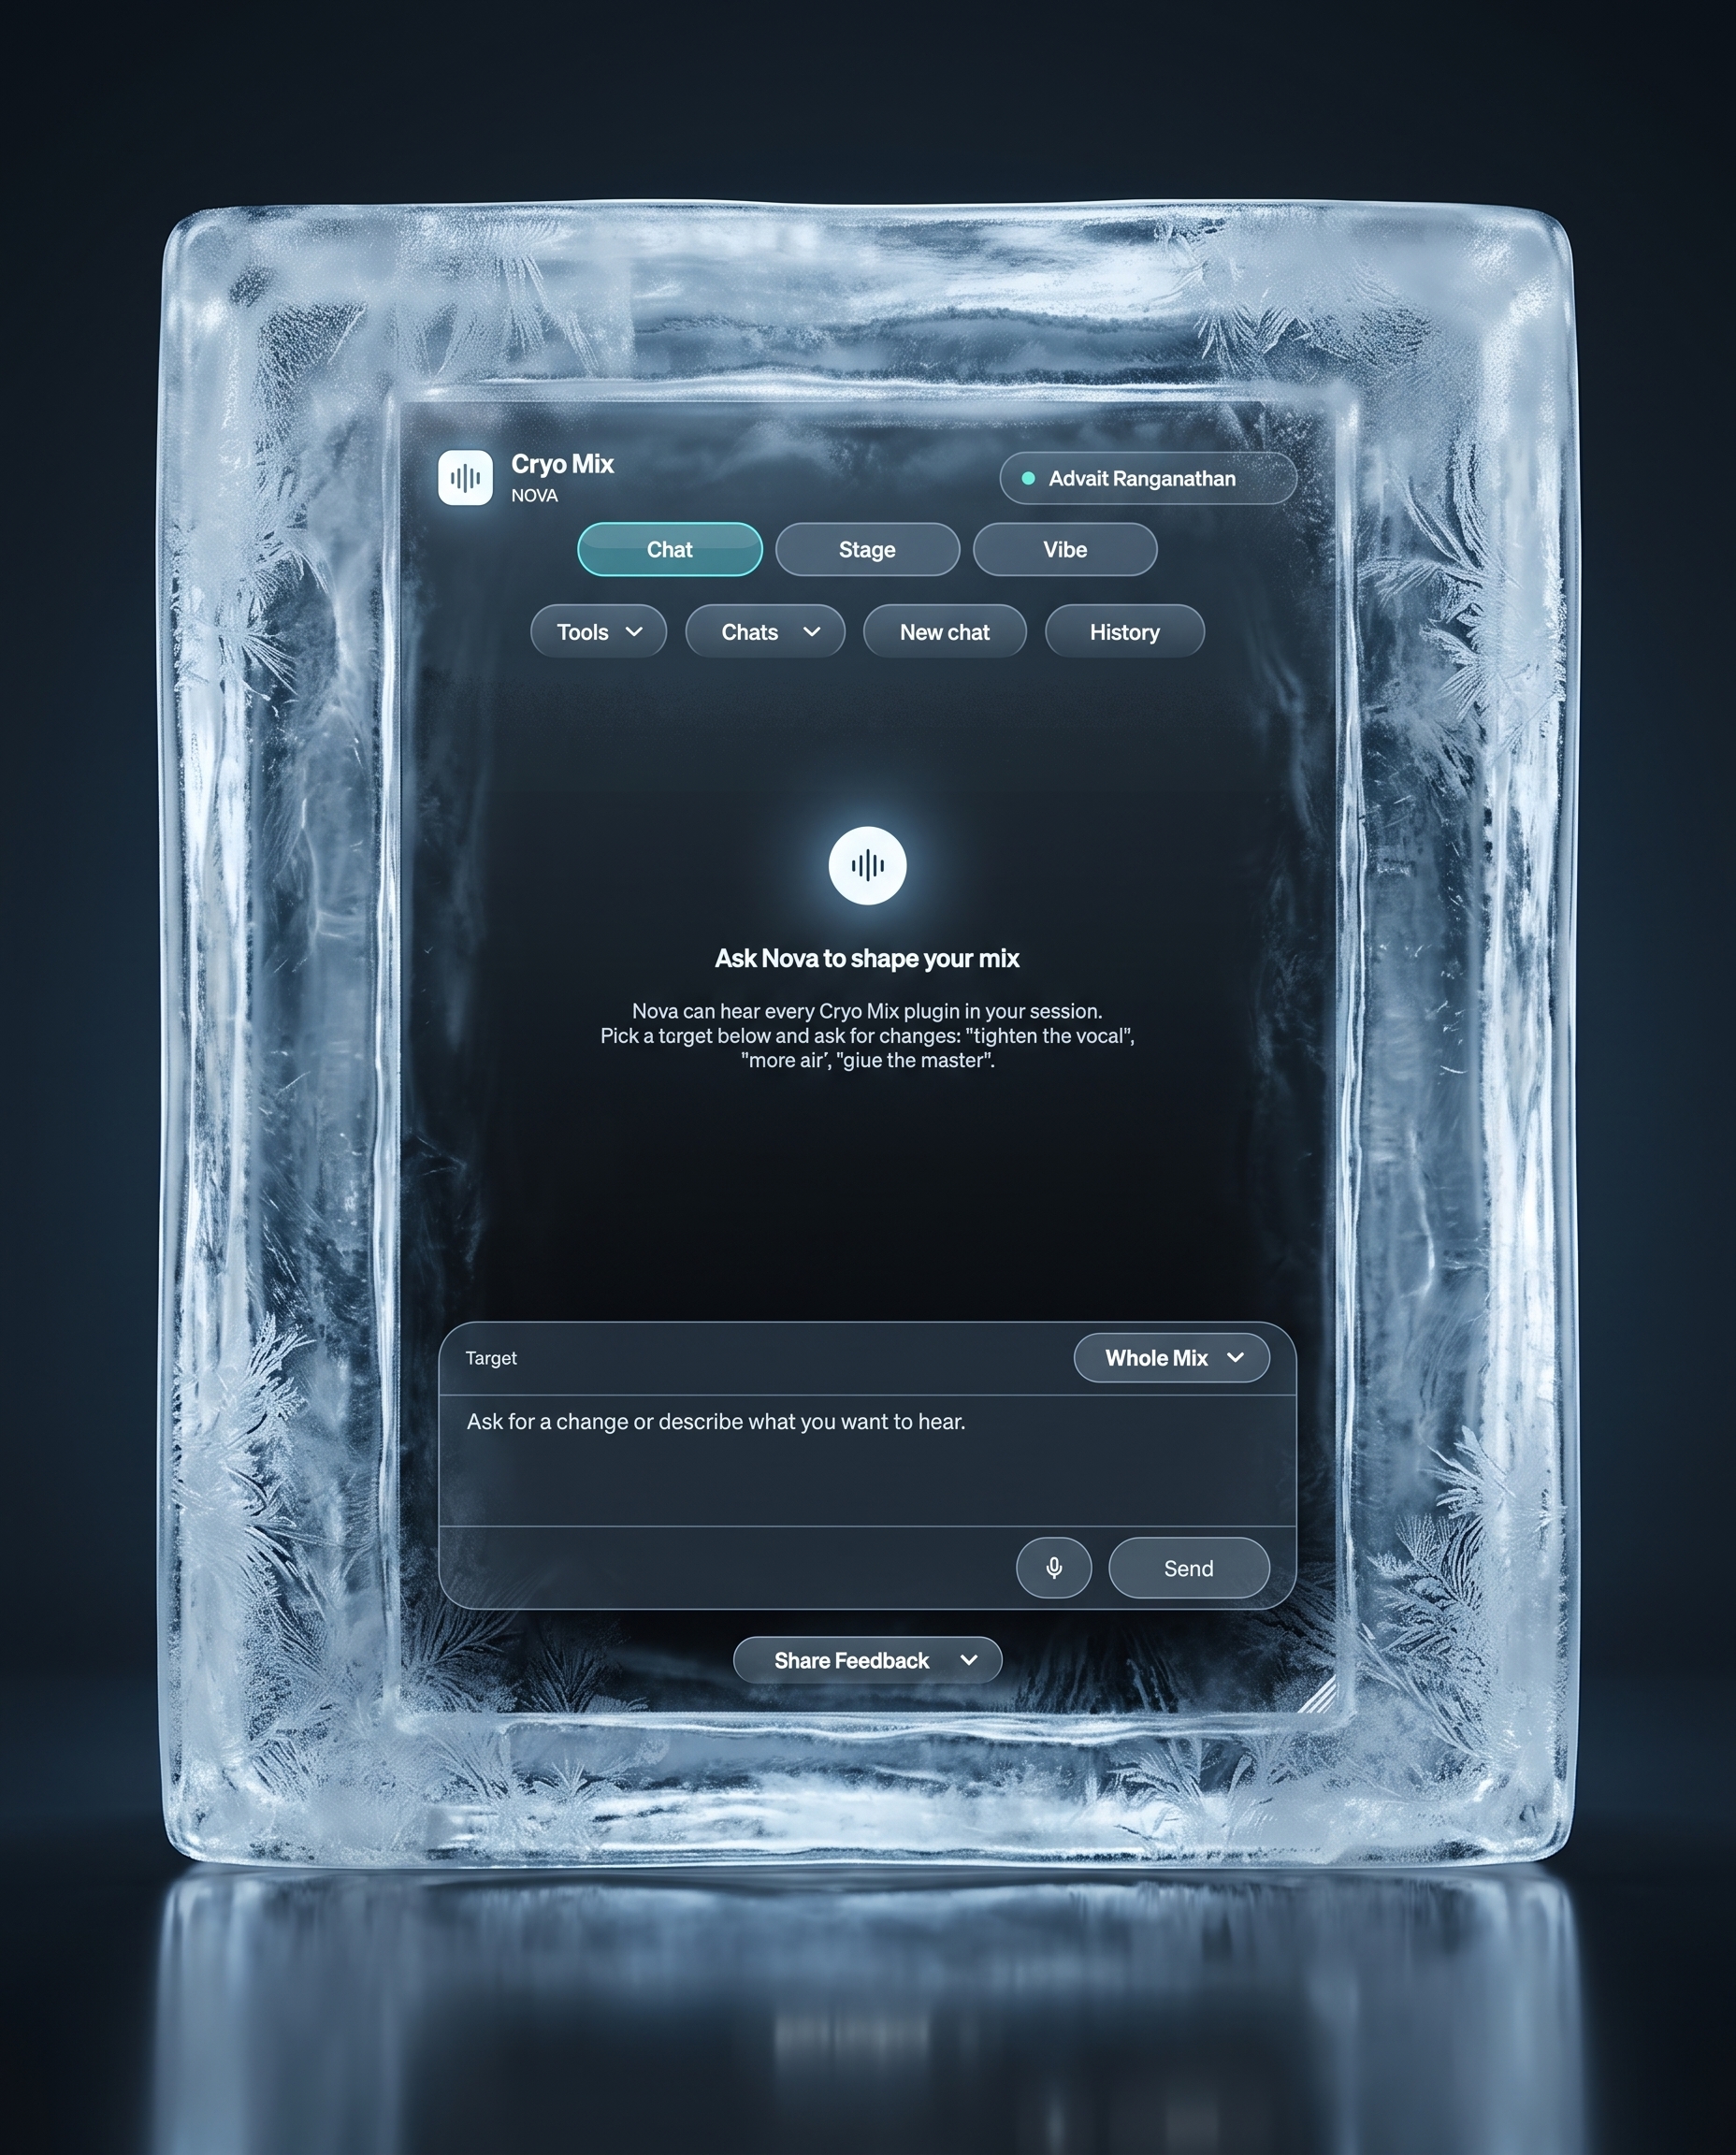
Nova is the built-in AI assistant that translates spoken or written requests into concrete parameter changes across every instance of the mixing plugin in your session. It already knows every stage on the list, so you do not need to know the fix is called upward compression or dynamic resonance suppression. You say the vocal disappears in the quiet parts, or that the top end is spiky, and Nova builds the chain.
Nova is not mapping your words onto a generic preset. Describe a sound the way people in your scene actually talk about it, in the language you actually use, and that is what gets built, not a flattened one-size version of it. Every move stays visible and adjustable. Nova sets the controls, and the controls are still yours.
What an equivalent chain normally costs
Assembling this set of tools from individual plugins, at professional quality, means a stack that typically includes something like FabFilter Pro-Q, FabFilter Pro-C, Waves CLA-76, Soothe2, Antares Auto-Tune Pro, Waves Doubler, Valhalla Room, and iZotope Ozone for mastering. That is before the years most engineers spend learning what each tool is actually good at.
Approach | Why choose it | Why not | Best for |
|---|---|---|---|
Separate boutique plugins | Best-in-class per tool, exactly the EQ or compressor you want | Highest cost, many windows, long learning curve, chain gets slow to navigate | Engineers with an established sound and a set workflow |
Console emulation channel strip (SSL, Neve, API) | Authentic character of a specific desk, familiar layout | Stops at EQ and dynamics, so you still stack pitch, modulation, imaging, and reverb behind it | Anyone chasing a particular console sound |
Assistive channel strip (iZotope Nectar, Neutron) | Suggests settings, one window, quicker start | Suggestions are parameter-level, so you still need to know which module to reach for | Producers who know the tools but want a head start |
Cloud mixing and mastering service (LANDR, eMastered, Cryo Mix web) | No plugins to buy, finished result fast, works on any machine | Upload and render round trip on every revision, less control mid-session | Fast turnarounds and anyone without a plugin budget |
Cryo Mix mixing and mastering plugin | Whole chain in one insert, real time in the session, described in plain language | One vendor's flavor of each tool, beta software today, still needs a DAW | Independent artists who want a finished sound without assembling a chain |
The point of the table is not that one row wins. It is that most people end up paying for two or three rows because no single row covered enough.
All in one plugin or separate plugins: where each one wins
There's a place for both, and the choice usually comes down to budget, technical knowledge, and mental bandwidth.
Choose an all-in-one plugin when you want a single tool to handle the heavy lifting. Speed of decision often matters more than surgical control, and juggling six different plugin windows just to test one idea kills momentum. Managing a large chain of separate plugins also taxes your CPU and drains your budget on extra emulations. The Cryo Mix plugin paired with Nova wins on efficiency, speed, accuracy, and ease of use.
Reach for separate plugins when you have a specific problem demanding a highly specific tool: a notch at an exact frequency, a compressor with a signature release curve, or a de-esser you have trusted for a decade. The Cryo Mix plugin does not ask you to abandon your favorites. It sits alongside them in your session.
The most valid argument against all-in-one plugins is that you are buying one company's opinion of how each stage should sound. If your signature sound relies on a specific 1176 emulation like the Waves CLA-76 or UAD 1176 Rev A, an all-in-one plugin is not going to replace it. What it will replace is the eight other plugins you loaded around it just because you needed something in each slot.
Real time in your session, not a round trip to the cloud
The plugin runs natively on your machine, so processing happens in your session rather than in the cloud. You are not waiting on a bounce or a render to hear whether something worked. It happens while you are still playing the track.
The browser tool at cryo-mix.com is still the right choice in plenty of cases: you are on a machine that cannot run plugins, you want a full stem mix and master handed back finished, or you are working on spoken word and just need it to sound clean. The plugin is for when you want the same processing where the rest of your session already lives.
Common mistakes when switching to an all in one plugin
Loading it and turning everything on. Twenty available stages does not mean the track wants twenty stages. Start with EQ, pitch, and dynamics, and add character, space, and modulation when the track asks for it.
Not using Nova. We built maximum functionality into the plugin, but we do not expect you to know how to use every stage yet. Ask for what you want and let Nova handle the rest.
Not saving a preset. Once you find a sound that fits, build a preset out of it. The next project opens with your sound already loaded.
Only loading the plugin on the tracks you think need work. The instances communicate with each other, so a session where half the channels are missing an instance gives the plugin half a picture to work from.
Skipping gain staging because the plugin has a leveler. A leveler manages what you feed it. Feed it something already crushed or already clipped and it will faithfully manage a damaged signal.
Mixing into the reverb before the balance is right. Space makes almost anything sound better on first listen and then hides the fact that the vocal is buried. Get the dry balance first.
Only checking width in stereo. Chorus, phaser, and width settings that sound huge on headphones can partly cancel in mono. Check both before you commit.
Using the mixing plugin to master. That is what the master plugin is for. Mixing and finishing are different jobs, and the tools are split that way on purpose. Check the finished master against streaming levels before you upload anywhere. Streaming platforms normalize playback loudness, so a louder master does not mean a louder stream (Spotify's loudness guidance is worth reading once).
Assuming beta means finished. It does not. Please tell us what breaks. That is what the beta is for.
Frequently asked questions
What is an all in one mixing and mastering plugin?
An all-in-one mixing and mastering plugin is a single plugin that contains the processing stages you would otherwise load as separate inserts: EQ, compression, gating, de-essing, saturation, stereo imaging, pitch correction, and reverb. One instance can take a track from raw to finished, which means fewer windows, one interface to learn, and one purchase instead of a dozen.
What is the Cryo Mix mixing and mastering plugin?
The Cryo Mix mixing and mastering plugin is an all-in-one plugin that runs natively inside your DAW. It ships as three pieces: a mixing plugin you load on every channel in your session, a separate master plugin for the master bus, and Nova, the AI copilot that controls every instance across the session. The mixing plugin contains six module groups (EQ, Dynamics, Pitch, Character, Stereo, and Space) covering automatic EQ correction, two-stage compression, pitch correction, four saturation circuits, full chorus and phaser designers, and a 3D reverb room designer. Nova builds the chain from a plain-language description of the sound you want.
Why does it need to go on every channel?
The plugin needs to go on every channel because instances communicate with each other and analyze your audio together. A plugin looking at one track in isolation can only tell you about that track. Instances that can see the whole session know what each element is competing with, which is what makes the analysis useful rather than generic.
Can one plugin really replace a full mixing chain?
For most independent artists on most tracks, yes. The stages that make up a standard chain are well defined, and there is no technical reason they need to live in separate windows. Where it will not replace a chain is when your sound depends on a specific emulation or a specialist tool you already know intimately. Most people keep two or three favorites and let the Cryo Mix plugin handle the rest.
Do I need to know mixing terminology to use it?
No. You describe what you want the record to feel like, and Nova works out which stages to use. You never have to learn that the tool you needed was called upward compression or a dynamic resonance suppressor. The controls stay visible, so you can learn them over time if you want to.
What sources can you use the plugin on?
You can use the plugin on vocals, beats, instruments, synths, bass, full mixes, and spoken word. The Pitch and Dynamics modules are aimed squarely at vocal work (correction, harmony, de-essing, leveling), Character and Space suit instrument and beat processing, and the master plugin handles glue and finishing. Leveling, de-essing, gating, and dynamic resonance suppression are as relevant to a podcast or voiceover as they are to a vocal take, and Cryo Mix has supported spoken word from the start.
Which DAWs does the Cryo Mix plugin work with?
The plugin runs in Logic Pro, Ableton Live 11 and 12, FL Studio 21, Pro Tools 2023.12+, Cubase 12+, Studio One 6+, Reaper 7, Garageband, and Bitwig Studio 5. Formats include VST3 and AU. It runs on macOS 12+ and Windows 10+.
Does it use more CPU than separate plugins?
Not necessarily. A single instance running only the stages you have engaged can be lighter than five separate plugins each with their own overhead. What does add up is a large session with a fully engaged instance on every track, the same as it would with any processing.
How do I get beta access?
The plugin is in beta now. Request early access through the Cryo Mix site and we will add you to the queue. Beta users get direct input into what ships in the release version.
Bottom line
An all-in-one mixing and mastering plugin is worth it when it actually covers the whole chain, not just the console half of it. That is what the Cryo Mix mixing and mastering plugin does: EQ, dynamics, pitch, character, stereo, and space on every channel, a master plugin for the finishing pass, running in real time in your session, reachable by describing a sound instead of naming a tool.
It is in beta. It will not replace the one plugin you have loved for ten years. We would rather tell you that now than after you install it.
Start mixing your track online while the plugin beta opens up, or request early access and we will get you in the queue.